3D-printing introduction for Insoles
We have all heard of it, 3D printing. It is becoming more and more popular nowadays, but many of us don’t know what kind of printing techniques there are, how they work and which technique will fit their needs. We hear great stories that everything is printed and we all want to take the next step into the future. However, there are two problems; what do I need and how do I get started?
Comparing to current production techniques
Let us start with the current production techniques and what makes 3D-printing so interesting?
One of the earlier techniques is where the podiatrist uses the sensorimotor method and glues all the elements on top of the insole. Then grind the insole and glue a top cover on the insole. Other methods are using semi-finished products or create insoles from a mold from plaster. These are manual methods, and labor intensive, but it is still done today.
ou might already have taken a next step and gone to milling the insoles or milling molds for creating thermoformed insoles. This is a big step forward, but there are still improvements that can be made:
- Manual labor: Whether you mass produce the same prefab insoles, or make many individual devices, with milling there is less manual labor. However, you still need to take the EVA, Polypropylene, vacuuming or thermoformed insoles out of the machine and you need to cut it out. Depending if you do 2 sided milling you also need to grind the bottom of the insoles and put a top cover on it.
- A lot of waste: You mill away about 80% of the material to produce insoles, which produces a lot of waste.
- 3. Working environment pollution: Milling creates a lot of dust in the room.
- 4. Costs of the material
And finally we can get into 3D printing, but which technique is the correct one for me?
Printing techniques
There are many printing techniques on the market, and we will focus on the most affordable for now, FDM (or FFF). If you are interested in other printing techniques like SLS, MJF, DLP or SLA, please follow us on LinkedIn, Facebook or YouTube and we will keep you posted.
What is FDM (of FFF) printing?
A good explanation for FDM Printing is the following quote: A typical FDM 3D printer, takes a polymer-based filament and forces it through a heated nozzle, which melts the material and deposits it in 2D layers on the building platform. While still warm, these layers will fuse with each other to create a three-dimensional part. Source: https://all3dp.com/2/fused-deposition-modeling-fdm-3d-printing-simply-explained/
The big advantages of FDM is that the overall experience is great and that it is easy to get started without too much training. The material is the most economic compared to other printing techniques, the printers are fairly small and they make almost no noise.
The disadvantage however, is that the components need to move a lot inside a printer and they require maintenance every now and then.
The best printing material
One important factor is the 3D printer, but everything depends on the material you want to use. Do you want a hard material or soft material? It depends on the requirements of the insole.
Soft material
The most frequent used material for soft insoles is TPU 95A or varioShore by colorFabb.
One of the things to keep in mind is that every material brand has slightly different settings and might perform differently. This means that brand A TPU 95A might be harder or softer than brand B TPU 95A even when the shore value of both are the same. The advantage of a soft material is that we can create regions with different harnesses by changing the slicer settings. More about this in the "Stages of 3D printing" part.
Material performance for the Rais3D TPU 95A:

Material performance for Raise3D TPU 95A, source: https://www.raise3d.com/filaments/tpu/
As you can see on the image above, the material is made to be wear resistant, flexible, and impact resistant. There are more brands available on the market, see table below for a short list of the most popular brands with price per kg:
| Price per kg | Price per insole (35 g) | |
|---|---|---|
| Raise3D TPU 95A | € 79,99/ $ 79.99 | € 2,80 |
| eSUN TPU 95A | € 36,99/ $ 38.99 | € 1,39 |
| Ultrafuse® TPU 95A (by BASF Forward AM) | € 72,52 / $ 38.99 | € 1,54 |
Hard material
Many of our customers prefer to print harder insoles with different materials. The most common material for printing hard products is PLA, PETG or PP (Polypropylene). Where PLA and PETG are more common used to print products with a plastic feel. This is not specific to medical end-use production. Whereas PP is safe for medical applications.
Material performance for the Raise3D PP:

Material performance for Raise3D PP, source: https://www.raise3d.com/filaments/tpu/
Stages of 3D printing with FDM
There are several steps we can take, and some of them are optional. The whole process can be divided into 4 stages: 3D Scanning, 3D Designing, 3D printing and 3D finishing.
The first stage – 3D Scanning feet
A patient will visit a clinic and an expert will examine the feet of the client. After examination and analysis, the decision will be made that the client needs custom made insoles. After filling in a specification form for the requirements of the insoles, the feet of the client are scanned.
The patient will stand on top of a 3D scanner and when the staff will click on the "Start" button, the scanner will scan the feet. This whole procedure only takes a couple of minutes.

There are different kind of scanners, take a look at our plantar side scanners LX500 Compact and the LX800 Plus. If you are also interested in creating shoe lasts you might be more interested in our LXL1800. All our scanners also create 2D scans.
Next to a scanner for fixed locations, there is a lightweight solution which has become really popular in the past years. You can scan the feet with an iPad and Structure Sensor. With our LutraCAD Scanner app you scan the feet, enter a specification form and upload the scans. Within the modelling software you can download the scans at any location.
The second stage – 3D Designing insoles
The files obtained during the first stage are received by a doctor, a CAD designing or production facility. We will load both scans into the software and select an insole pattern. Depending on the kind of shoe the client is wearing we can choose a sports shoe, classic shoe or a custom insole pattern.

The software used, is LutraCAD Insole software which takes care of everything you need for 3D printing. One important setting is the output type. We can choose between milling and printing. Within the printing we can choose for a shell (which is commonly used for milling or printing with SLS), or solid insole for printing with FDM. This is a watertight model.
With the given design options and settings. You can modify the insole exactly to the treatment plan. At the step of "3D printing" we can slice the insole in multiple parts, and in the slicing stage we can define that hardness of a specific region.
The whole design process only takes between 2 and 10 minutes. At the end of the steps we can export our watertight STL. We can now go to the production stage of the insoles.
The third stage – 3D printing insoles
In our example we use the Raise3D TPU 95A and the Raise3D E2 printer. This printer has a good printable area to print the maximum foot size. The printer has 2 printheads, which means we can print 2 insoles in IDEX (mirror or copy mode). For smaller insoles we can print 2 insoles at the same time in mirror or copy mode. This can speed up the printing process. For larger insoles we only use 1 printhead at the same time.

Before we can send the insoles to the printer, the printer needs to know his instructions. Raise3D has a free 3D slicer software called ideaMaker (https://www.raise3d.com/ideamaker/). Within this slicer we can change a lot of settings, like; infill pattern, speed, cooldown, infill regions, etc.

Nozzle diameter (hardware)
By default this printer comes with a 0.4mm nozzle. This defines the line thickness of the print. The more material we can print at once, the more it reduces the time. If you want to print insoles with a good printing time, we advise to invest in a 0.8 mm nozzle (price around 25 euro).
| (per insole) | 0.4 mm nozzle | 0.6 mm nozzle | 0.8 mm nozzle |
|---|---|---|---|
| Print time | 1 hour 46 minutes | 1 hour and 10 minutes | 54 minutes |
| Weight | 30 g | 35,2 g | 37,2 g |
| Estimated price | $ 2.56 | $ 2.82 | $ 2.97 |
| Quality | High | High | Rough, feel print lines |
Optimal slicer settings (software)
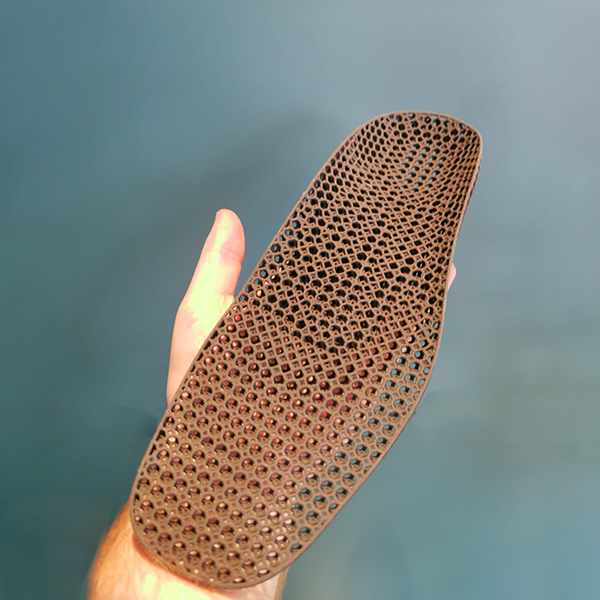
There are numerous options within the slicing software. The most common used to define the hardness, where we can modify the infill pattern and percentage. In our sample we use the infill pattern type "Lines". Next to "Lines", we have options like Grid, Rectangular, Honeycomb, Triangles, Cubic, Concentric and Gyroid. More info can be found on the ideaMaker documentation
Together with the infill percentage we create a hardness of the insole. In this sample we have set the infill percentage to 20%, which compared to EVA gives about a 40 shore hardness. There are more settings, like cooling settings, print speed per layer/infill/skin, shells, cooldown, etc.

Pre-defined configuration
We, as LutraCAD have tested a lot of printers with different materials and settings and we work together with experts to make the perfect settings for printing insoles. We will supply more different printers with optimal settings in the future. From within the software we have simplified the process of production, no more slicing by hand. Our software automates the slicing for all supported printers and materials.
For example the printer you see here is a Mosaic Element HT for printing insoles, this printer has a heated chamber. Which allows you to print high strength parts with better layer adhesion.
Find out more about Mosaic Element HT

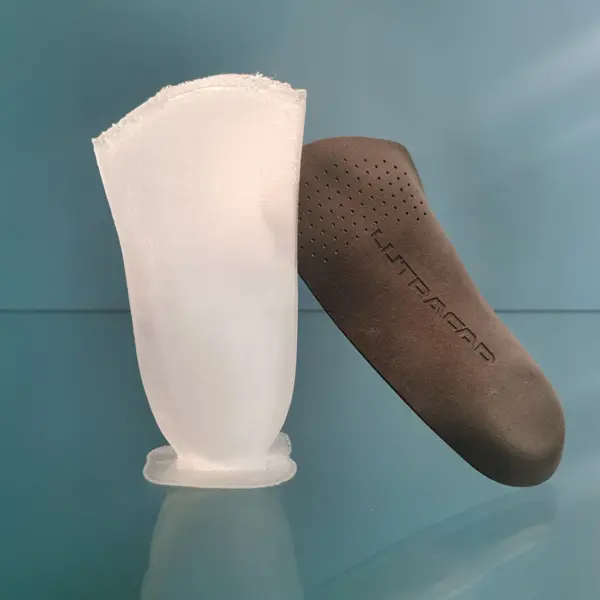
The fourth stage – processing and finishing
After printing, the insoles are ready for the finish. There are customers that do not put a top cover on the insole and deliver the device after printing. We do finish the insole, so that it looks like a higher quality product.
On the photo you see 2 identical printed insoles, 1 without a top-cover and one with a top cover. So far we have received many positive feedback on the final product quality.

Final thoughts
Everyone can get into 3D printing, but starting from scratch is hard. You have a lot of testing and finetuning to do to get the optimal speed / quality result. With the pre-defined settings we provide, you will have a plug-and-play solution. Load the filament and send the files to the printer after designing and you are ready to go.